![[SoundStage!]](../sslogo3.gif) Synergizing with Greg Weaver Synergizing with Greg WeaverBack Issue Article |
| June 1998 DIY Equipment Rack
Besides offering sonic colorations, the other major problem with this variety of equipment stand crops up if your equipment just about fills the shelves nicely to begin with. Without adjustability, you may find it impossible to use any kind of isolation bases beneath individual components like those offered from Townsend, Vibraplane and Osiris—or even the $10 home-brew I described last August here in "Synergizing." They may also limit your choice of component placement and arrangement. This new fully adjustable system seemed to be both a very clever and solid approach. When I got home from our listening session I started looking through my catalogs to locate this wondrous new component rack. I had no trouble finding it as it was made by a "major" manufacturer—and listed for $350. No thanks; I'll just make one. And the cool thing about this project is that the only tools you’ll need will be a drill, an adjustable spanner wrench, a large straight-edge rule (like a yardstick) and a pencil. My next trip to my favorite local home-supply center found me in the back of the building where they stock all their lumber. I was on the prowl for a very heavy and densely pressed particleboard known as Medite. I wandered through the milled-wood section until I found something close to what I was looking for, a stack of 4' x 8' sheets of 5/8" thick medium-density fiberboard. As its name suggests, this stuff is dense, made essentially from sawdust and glue pressed together into one decidedly non-resonant sheet, and sells for about $10.00 a sheet. Though not exactly what I wanted, it would work just fine. The shelves in the rack I had seen advertised were 16" by 24". Now it doesn't take a rocket scientist to realize that a 4' by 8' sheet of wood cut squarely through its running length then into 16"-wide sections will yield exactly 12 shelves at 16" by 24" by 5/8", with no waste. As this particular store’s policy was to make the first two cuts free and then charge $.25 a cut after that, milling fees came to a total of $2.25 (one up the middle, then five each on the two resultant halves). Since I didn't own or have access to a table saw at the time (as you likely may not), that was a small price to pay for perfectly square cuts. Don’t try to save the few dollars by using a circular saw. The shelves won’t be identical enough for the lamination process later when we begin construction. After communicating the cutting instructions to the young and amiable woodcutter, I headed off to shop for the metal components, the all-thread, washers and nuts, in the hardware section. I found the all-thread in both 36" and 72" lengths. The shorter length was perfect for my project and sold for $3.16 each in a 5/8" diameter. Obviously, you can use the longer lengths of all-thread to add more height, and more shelves, but keep in mind that taller is also likely to be less stable. I may have tried the 3/4"-diameter all-thread for my corner posts, but the store did not have the 3/4" washers that are also an integral part of the plan. If they had, the price jump from the 5/8" all-thread to the 3/4" all-thread was only about $1.50 a rod. However, the price jump from a 5/8" washer ($.08 each) and nut ($.10 each) set to the 3/4" set went from $.18 to $.68 a set. As you need 32 nut-and-washer sets for a four-shelf version (four of each on top and four more of each below each shelf), this is a significant cost increase. It will raise the cost of the project by an additional $20, including the $6.00 increase for the larger diameter all-thread. That’s more than 40% of the cost of the whole project. Quite honestly, in my application, the 5/8" all-thread supports work more than adequately. Opting for the 3/4"-diameter version will raise the price from about $35 per finished unit to about $55, and given my experiences, it just isn’t necessary. But those of you out there who subscribe to the theory that "too much is never enough" should love them. Last on my list of things to acquire on this mission were Elmer’s Carpenters Glue and flat-black spray paint. I had decided on "basic black" for my room, though you can certainly use any color that will compliment your room or please your significant other’s fancies. Off I went to the paint section where I found one 4-ounce bottle of the glue and two 11-ounce cans of spray paint, on sale no less, totaling about $5. With all of my precious cargo safely loaded into my car, I was homeward bound to assemble my new toy. When I arrived home, the first thing to accomplish was to accurately drill all of the necessary holes in all the shelf pieces for the all-thread corner posts. As I was only planning on ending up with a total of four selves, I would need to pre-drill eight of my twelve shelf sections, leaving four sections as extras. The reason I chose the 5/8" thickness for my project was that I intended to laminate each shelf, to use two identical-sized pieces of wood glued together for additional strength and rigidity, to obtain my final desired 1 1/4" total thickness. I loaded an 11/16" bit into my drill, a size slightly larger than the diameter of the all-thread rods, to allow for easy passage through the final hole. Next, I measured in 1 1/4" from each corner on a diagonal line drawn from corner to opposite corner to mark the center point for my drill bit. Now here is a little time-saving and accuracy secret. I aligned four of the 5/8" shelf segments at a time for drilling. Place the one shelf that you pre marked for drilling squarely on top of the stack of three and then drill through all four pieces of wood at one time. This is faster than doing each one separately and, more importantly, assures that the holes will be perfectly aligned in each of two pairs of shelves. Even if your measurements are slightly different on the second set of four, those two sets of two will align perfectly as well. It also prevents excess chipping as the bit makes its way through each layer. When finished with the first set, I moved on to my second stack of four pieces, repeating the sequence of steps to complete the drilling. Next I took the first two shelves from stack one and applied a thin but even layer of Elmer's carpenters glue to the top of one of them with an old paintbrush. I then carefully aligned and lowered the second shelf on top of it, creating my 1 1/4"-thick laminated shelf. You may wish to go a step further here and utilize what is known as a constrained-layer damping technique. Pick up a 4' x 8' sheet of polystyrene insulation (also sold at home-supply stores in varying thicknesses, typically starting at about 1/8" or 1/4") for about $10. It should be similarly cut into twelve 24" x 16" pieces. You can do this with good scissors or a utility knife. The sheets are then glued between each pair of shelves to create a "sandwich" of wood, insulation and wood. The layer of polystyrene breaks the resonant cycle of the wood by offering both a material with a different fundamental resonance and allowing an area of energy transfer between the two similar materials. I plan to make my next rack this way. I then threaded a nut, followed by a washer, onto one end of each piece of the all-thread and ran it down about two inches. I placed my first laminated shelf pair over each piece of all-thread until it was touching the washer/nut combination just installed. Next I inserted a washer followed by a nut on top of the shelf on each piece of all-thread and tightened it down on the shelf to secure my top (or bottom) shelf.
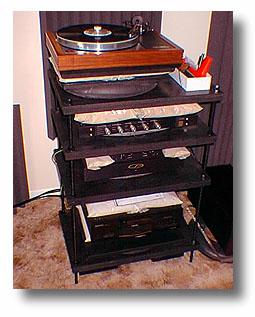
Next I made the final adjustments to the shelves to set the right height for each piece of equipment and isolation platform that I would be using. Once I had squared the top shelf and set each other shelf for the right clearance, I made sure each shelf was spaced evenly with the help of a tape measure. Then I went over each shelf and made sure it was tightly anchored between the nut/washer combo by using my adjustable wrench to firmly tighten and secure the position. All that was left to do was to spray-paint it the color of my choice (flat black). My two 11-ounce cans of bargain flat-black spray paint proved to be more than enough. After first going around the whole stand in the upright position, with close attention paid to getting an even coat on the hyper-absorbent edges of the shelving, I waited for my first application to dry. As soon as it had (about 20 minutes with the enamel I was using), I flipped the unit over on its top and covered it again from the bottom. Twenty minutes later, once again right side up, I touched up all the little spots that I had missed or needed a bit more attention for whatever reason, like the insides of the all thread and light spots on the shelves. Voilà! The finished product! At about one-tenth the cost of the "store bought" units, this new and inexpensive rack will offer you a VERY rigid and solid platform on which to base the rest of your isolation techniques (that’s my third hint; take a look at "The Ten Dollar Isolation Platform" in the archives). Even on its own, it is still much less resonant, offers less sonic coloration and better energy transfer than those other more expensive, hollow tubular-steel variety of stands. And, hey, you just saved over $300! Why not put the extra money you saved on this project into software? Buy that boxed set you’ve been looking at and putting off. You deserve it! After all, that is why we do all this, isn’t it? Enjoy. ...Greg Weaver |
|
| All Contents Copyright © 1998 SoundStage! All Rights Reserved |
 Given both the number and quality of the responses to my
do-it-yourself silver-interconnect article back in February (I’m still getting
letters about it—thank you!), I felt another handy-dandy, DIY, save-a-pile-of-money
and get-a-great-sonic-results offering was in order. This story begins one fine winter's
day some years ago while I was visiting a friend, Hal. While preparing for a gathering of
the Southern Maryland Irregulars, I took envious notice of his really cool-looking and
highly functional equipment rack. It was about 30" high and had four 1
1/4"-thick shelves. The four upright corner posts of this Spartan-looking rack were
nothing more than blackened all-thread, a long piece of round metal with a continuous
thread running its entire length. The use of this continuously threaded rod makes it a
snap to adjust shelf placement any way you want. Even more importantly, it affords you the
ability to make adjustments any time in the future should you acquire new and
different-shaped equipment or just feel the need for a change. Most of the pre-built
equipment racks have all the shelf heights both predetermined and fixed.
Given both the number and quality of the responses to my
do-it-yourself silver-interconnect article back in February (I’m still getting
letters about it—thank you!), I felt another handy-dandy, DIY, save-a-pile-of-money
and get-a-great-sonic-results offering was in order. This story begins one fine winter's
day some years ago while I was visiting a friend, Hal. While preparing for a gathering of
the Southern Maryland Irregulars, I took envious notice of his really cool-looking and
highly functional equipment rack. It was about 30" high and had four 1
1/4"-thick shelves. The four upright corner posts of this Spartan-looking rack were
nothing more than blackened all-thread, a long piece of round metal with a continuous
thread running its entire length. The use of this continuously threaded rod makes it a
snap to adjust shelf placement any way you want. Even more importantly, it affords you the
ability to make adjustments any time in the future should you acquire new and
different-shaped equipment or just feel the need for a change. Most of the pre-built
equipment racks have all the shelf heights both predetermined and fixed.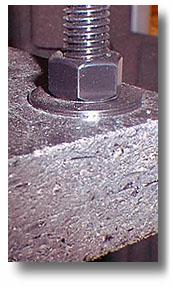 Now came the tedious part. I had to spin the next nut on each
piece of all-thread all the way down to the position where the next shelf was to rest.
This was time consuming, but I just followed the nut, washer, shelf, washer, nut recipe
until the other three shelves were in place. Keep in mind that although you have enough
pre-cut wood to make six shelves, four gets congested pretty quickly. Just be sure you
will have enough space between your shelves for all your planed components (and,
hopefully, methods of isolation) and that you purchase enough of the nut/washer sets to
handle as many shelves as you plan to use.
Now came the tedious part. I had to spin the next nut on each
piece of all-thread all the way down to the position where the next shelf was to rest.
This was time consuming, but I just followed the nut, washer, shelf, washer, nut recipe
until the other three shelves were in place. Keep in mind that although you have enough
pre-cut wood to make six shelves, four gets congested pretty quickly. Just be sure you
will have enough space between your shelves for all your planed components (and,
hopefully, methods of isolation) and that you purchase enough of the nut/washer sets to
handle as many shelves as you plan to use.