![[SoundStage!]](../sslogo3.gif) Synergizing with Greg Weaver Synergizing with Greg WeaverBack Issue Article |
| November 1998 The Amazing Home-Brew Silver Bit Transfer Leftovers again After the success I experienced with the SSTs back in February, I decided to try to come up with something which might enhance the transfer of ones and zeros from my transport to my DAC. Given the excess of magnet wire, 30AWG solid silver wire and Teflon[R] insulation I had lying around from that original project, it just seemed the natural thing to do. Well, after several trials that were good but not stunning, I hit on the one design that kind of did it for me. Some of you picked up on the fact that I had made a digital cable by reading between the lines in some of my work, and after some diligent coaxing I agreed to share the design with a few of the "chosen." That small and select test audience was mostly comprised of members of the Southern Maryland Irregulars and a number of very loyal and supportive readers. When that beta group started saying things like "magic," "fast, clean and detailed" and "hardness is gone, timbral truth restored," I decided that I likely wasn’t suffering from aural hallucinations and that it was time to share the construction with you all. Those of you who bought into the silver wire and Teflon insulation back in February, go liberate them from the repository in which you’ve been storing them all this time; it’s time for them to earn their keep yet again. For you folks who didn’t, head for the telephone. Call Myron Toback, Inc. in NYC (212-398-8300), purveyors of high-quality solid silver wire. When they answer, tell ‘em you are an audiophile looking for 30-gauge SOLID silver wire, not STERLING silver wire. They will probably know exactly what you want. In the more than 300 letters that I have received about the original SSTs, it came up repeatedly that Myron Toback was getting used to handling the needs of audiophiles. Don’t be surprised if the operator who answers your call knows exactly what you want. It would seem that they received enough calls for the stuff that they now respond to any callers who ask for this specific wire with, "Oh, you’re another one of those audio people."
Shack attack Next stop on your home-brew adventure is none
other than your local Radio Shack. Pick up a set of the Radio Shack entry-level
gold-plated male RCA terminations (Cat. No. 274-850) at $2.59 each. Why not the latest,
greatest, extra-heavy duty, super-duper, ultra-special, Tunisian gold-plated rhodium,
imported from Zimbabwe, supercalifragileistic audiophile approved ones that cost 20 times
as much or more? I wholeheartedly believe in keeping the mass down because of the
relatively low current involved, and I prefer the simplest plating scheme I can find for
identical reasons. I chose the gold-plated units in order to keep similar
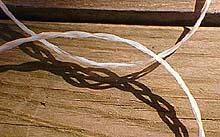
surface-to-surface contact metals. Those of you who just can’t be bothered to wait for the silver wire to come via the United States Postal Service or who crave more immediate gratification can pick up a substitute conductor while you are still at the Shack. Stroll over to the to the parts area and snag yourself the Radio Shack magnet wire pack (Cat. No. 278-1345a) which contains one 40' spool of 22AWG, one 75' spool of 26AWG and one 200' spool of 30AWG, all for a grand total of $3.99. The results will not be as detailed and open, but they will still be mighty good. You will be using ONLY the 30-gauge spool for this project, as the others are way too thick. Your construction techniques will be identical to those below except that you must remove the enamel finish from the ends of the magnet wire BEFORE you try to solder them to the RCA terminations. Waiting for the electrician, or someone like him First, cut three equal strands of the silver (or magnet) wire to the length you will require to hitch your transport to your DAC. I made mine a standard one-meter length. Next (unless you are using the magnet wire) cut three equal lengths of the Teflon tubing about one-half inch shorter than your three silver conductors. This will allow for about one-quarter inch of the silver conductor to be exposed at each end of the Teflon once you have fed the silver conductor through the insulator tube. Lay out a tape measure or yardstick on your work surface to facilitate the measuring process. Now this will probably be the most tedious part of the construction unless you are using the magnet wire. Because it is insulated, you won’t need deal with this part of the construction. Please skip ahead to the next paragraph. You silver fans, read on. Begin to feed one of the silver wires through a section of Teflon tubing by inserting one end of the wire into the tubing, then literally inch it slowly and carefully into the tube. I found the easiest way to do this safely was to move your fingers back from the Teflon no more than an inch at a time and then gently push the wire forward into the insulation. Don’t try to do too much at one time as you will "kink" the wire and have to start all over again with a new piece of cable. Kinks will cause excessive resistance and have other deleterious effects on the end result. To facilitate the insertion of the raw wire into the Teflon tube, you may choose to lubricate the silver with olive oil or Caig ProGold, as I did. BE PATIENT and take your time! It is well worth it. Repeat this procedure with all three wires and move on to the next step. If you are using the magnet wire, take some sand paper, a knife or something else sharp and carefully scrape or sand away about 1/4 inch of the enamel insulation from each edge of your three conductors. Time to fire up the wood-burning kit -- er, I mean soldering iron -- and get ready to breathe some lead. Mark two of the Teflon-jacketed silver cables at both ends with a permanent marker so that you will be able to tell which ones they are after they get soldered and braided. You can omit this step if you have a VOM (Volt/Ohm meter) which can be used to check the wire continuity. Otherwise, after marking two of the silver-filled Teflon tubes (at both ends), you will need to "tin" both ends on each of the three wires (yes, you with the magnet wire will do this too). Tinning is the process of pre-depositing an amount of solder on the wire so that it can make a good, solid connection. Once all the wires are tinned, take the two with the markings, insert them into the center pin and solder them carefully to the first RCA jack. Make sure the Teflon insulation doesn’t slide too far up the cable from the end, and if it should, simply slide it back down into place. Now solder the last unmarked wire to the ground pin. Cut a narrow strip of good electrical tape (like Scotch 33) and wrap it around the three cables to provide an anchor and some extra strain relief. At this point, you may VERY CAREFULLY crimp the large circular strain relief provided on the ground tab of the connector around your bundled troika, and again use just the smallest amount of good electrical tape to attach them to the shield post for some measure of strain relief. Next slide the threaded outside jacket of the RCA jack on from the unsoldered end of the cables and thread it on to finish the first jack. Now, secure your newly finished end in a small set of helper’s grips or something similar (you can use a large book or a friend’s helping hand), and begin to braid the three wires. To braid the three wires into a single, more sturdy run, (and provide for minimization of induction and capacitance) separate them and lay them out with one to the left, one centered and one to the right. To begin you simply take the left wire and place it over the center one, which now makes the original center wire the new left wire and the original left wire the new center wire. Next, take the right wire over the new center wire, making it the new center wire while the wire that originally started as the left one, then became the center, is now the new right. You then repeat the left over center, right over center, left over center pattern again and again until the whole thing is bundled as one. Don’t braid them too tightly or you can damage the delicate conductors. I found a pitch of about one full braided revolution about every inch to inch and a quarter to provide excellent results. Maintain this process consistently for all three wires until you finish the entire running length of the cable. Once you have completed the weave, again apply a narrow strip of good electrical tape to hold the braiding together. Now, don’t forget to slide the final RCA jacket up onto the bundled wire trio for this end before you solder any of the ends to the last RCA connector or you will have to desolder the end and insert it to finish the design. Now, either take your two previously marked positive conductors, or use you VOM in its continuity mode to identify them, and attach them to the center pin on the second RCA connector for the positive run. Solder the final single conductor to the ground tab on this connector and lightly close the strain-relief clamp on this end, just as you did with the first one, then lightly tape the bundle to the strain relief with as little electrical tape as necessary. Thread the outside jacket onto the plug and you have just about finished the Silver Bit Transfer. If you have a VOM, double check to make sure you didn’t cross-wire any of the conductors. If you don’t have one, just keep the volume down, way down, until you know the cable is working correctly. I have marked my cable with little arrows so I can always reinstall it in the same direction. The reason for this is that once a cable is run in or "seasoned" in one direction, it takes time to re-season if inserted in the other direction. You’ll notice in my picture of the completed SBT that I have chosen to add one of the Steward RF ferrite shields. This is up to you, but I feel the resultant sonic effect is warranted. You’re ready to ROCK! Drag your newly completed project to your audio components; insert it between transport and DAC and light up those digits. Be prepared for about 100 to 150 hours for complete run-in, but the cable will sound VERY GOOD right out of the gate. Leaving your transport on (so your DAC is receiving a primary "lock") is usually all you need do for run-in if you don’t want to annoy the family and pets while you "season" the cable. Digit allure
...Greg Weaver
|
|
| All Contents Copyright © 1998 SoundStage! All Rights Reserved |
 I ordered up 220' of 30-gauge solid silver for my initial experiments and have
had the need to replenish the order once to date. Why 220'? Well, that is how much wire it
takes at that gauge to hit the minimum order level. The total, with shipping, was a
whopping $23.10. As this wire is not insulated, you must also come up with a vendor for
the Teflon jacket. Try Allied Electronics (800-433-5700) and order up a 100' spool of PTFE
(high-grade Teflon) tubing in the proper size (stock number 708-4926, $20.93) to insulate
the conductors. These prices and stock numbers may have changed since my last order, so be
sure to verify everything before you get off the phone.
I ordered up 220' of 30-gauge solid silver for my initial experiments and have
had the need to replenish the order once to date. Why 220'? Well, that is how much wire it
takes at that gauge to hit the minimum order level. The total, with shipping, was a
whopping $23.10. As this wire is not insulated, you must also come up with a vendor for
the Teflon jacket. Try Allied Electronics (800-433-5700) and order up a 100' spool of PTFE
(high-grade Teflon) tubing in the proper size (stock number 708-4926, $20.93) to insulate
the conductors. These prices and stock numbers may have changed since my last order, so be
sure to verify everything before you get off the phone.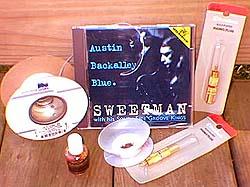 Because my transport and DAC use gold-plated inputs, this was the ideal choice
to limit oxidation and other pollutant build-up over time. Finally, if you don’t
already have any silver content solder, you can pick up a small spool of 2% silver solder
(Cat. No. 64-013) for $3.49, and you are ready to fabricate some digital heaven.
Because my transport and DAC use gold-plated inputs, this was the ideal choice
to limit oxidation and other pollutant build-up over time. Finally, if you don’t
already have any silver content solder, you can pick up a small spool of 2% silver solder
(Cat. No. 64-013) for $3.49, and you are ready to fabricate some digital heaven.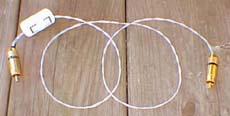 The freshly slain SBT is just a bit hard and a tad on the
bright side (exhibiting a clockwise tilt in balance) for the first hour and a half or so,
but settles quickly. However, the unbelievable bass extension and definition, inner
detail, expansive staging, delineated imaging, high-frequency shimmer, focus and
articulation (without hardness), truthfulness of timbre and overall dynamics, both macro
and micro, should win you over right from the word go -- and they all only get better with
time. Once the cable is all run in, you are looking at a very serious over-achiever for
the paltry price of admission -- under $20. I have found it to best every digital cable I
have in-house (which will all remain nameless), but which range in price from $100 to
$300. Let me know what you hear.
The freshly slain SBT is just a bit hard and a tad on the
bright side (exhibiting a clockwise tilt in balance) for the first hour and a half or so,
but settles quickly. However, the unbelievable bass extension and definition, inner
detail, expansive staging, delineated imaging, high-frequency shimmer, focus and
articulation (without hardness), truthfulness of timbre and overall dynamics, both macro
and micro, should win you over right from the word go -- and they all only get better with
time. Once the cable is all run in, you are looking at a very serious over-achiever for
the paltry price of admission -- under $20. I have found it to best every digital cable I
have in-house (which will all remain nameless), but which range in price from $100 to
$300. Let me know what you hear.