![[SoundStage!]](../sslogo3.gif) Synergizing with Greg Weaver Synergizing with Greg WeaverBack Issue Article |
| May 1999 System Zap Arrestor ZAP -- there goes the music Has anything like this ever happened to you? Your favorite record finishes, the Lift trips and picks up your tonearm, and you casually get up to go turn over the record. You stroll over to the equipment rack, and, as you pick up the tonearm (or touch anything else for that matter), ZAP -- a loud bolt of static races through your system. You had built up a charge which, finally able to find a path to ground through your equipment, discharges from you through your system! Yikes! Did those tweeters shoot out and stick to the opposite wall? Did you blow a fuse in the amp or preamp? Did your DAC or processor stop working because the static discharge took out an IC or some other low-voltage device? I hope you’ve never experienced anything as devastating as these described catastrophes. But just to make sure you never have to, this month I will share with you an affordable, easy-to-follow recipe for the creation of a device that will prevent just such an occurrence. Substitute Believe it or not, this is an easy problem to alleviate. All we need to do is to provide an alternate ground path BEFORE we touch any of our equipment. The parts I’m about to describe may be substituted for any others you like. Mine were based on my own aesthetic needs and were heavily influenced by what I had already lying around -- and to some extent, by some fond memories from my checkered past. First you will need some wire, the length of
which will be determined by the running distance from a convenient location on your
equipment stand and the nearest grounded outlet. More on that later. I chose to use some
Monster Cable Super Flat Mini speaker wire, for three reasons. First, I had some on hand.
Look around and see what you may have available. Keep in mind, you can use just a single
run of any reasonable-gauge wire, say over 14 gauge or so. Also, this stuff is made for
custom installation, meaning that it is both flat and insulated with a special jacket that
can be painted to suit your needs. It sells for about $.80 a foot, and because of its
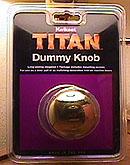
unique Next, I chose a "dummy" doorknob (see right) made by Kwikset, which I picked up for about $6 at my local Lowe’s. You can use any metallic object to your liking, so long as it will both conduct the static charge away from you and let you easily and securely attach the wire you have chosen. My reasons for choosing the bronze-colored "faux" knob stems back to a "plain sight" incursion made many years ago on the railing around the dance floor of a club I had managed named Hooligan’s. That raid yielded four solid brass railing caps, and stemmed the subsequent formation of a gentlemen’s fraternity, a very exclusive fraternity, known as the "Knights of the Brass Ball." Believe me, that is all you want to know! With that out of the way, it was also chosen as it was a good, solid metal and it had screw holes for the necessary attachment of the wire.
Ground control OK, now take your wire and strip it at both ends. If, like me, you have chosen to use speaker wire, you will attach the two No.6 ring tongues, one to each conductor, at one end. The single No.10 ring tongue is used to connect both conductors as one at the other end. Since the two No.6 rings will be attached together by the knob at the split end, this will effectively create a single conductor.
Now, attach the "knob" at the end with the two No.6 rings to the two screw holes in the "faux" knob and tighten them down securely (see upper right). You are ready to place the knob (or what ever you have chosen to use) in a prominent place on your equipment stand. Mine is on the top shelf, in front of my turntable tool kit. You can place your "shock conduit" wherever you like, but it is best if you opt for a place that is easy to touch as you walk up to the stand so you can readily "short" yourself before you touch ANY of your equipment.
No more arcing There you go! Depending on what you have lying around, this safety device can be constructed for less than $20. Of course, feel free to elect to go completely nuts and use some very exotic item that will make you happy or suit your own personal exotic aesthetic tastes. Let me know what you use as your audio zap arrestor and I’ll share the most unique items that are relayed to me. Until then, keep the music playin’. ...Greg Weaver It would seem that I missed one item that would make the Zap Arrestor even more effective and safe. Head on down to Radio Shack (or your favorite purveyor of electronic parts) and pick up a pack of 1 Meg carbon-film resistors, 5 to a pack, for a whopping $.49 (Part Number 271-1135). Insert one of these little safety devices in series – between the wire and one of the ring tongues – with the wire and the ground. It will easily go between any of them, either at the knob end or the ground attachment end. You will need to pick up a 22-18 AWG crimp on butt connector, also available in the afore mentioned Radio Shack 81-piece termination kit – they’re the red ones. Simply crimp one of the ring tongues to one end of the resistor and the butt connector to the other. Then crimp the butt connector to the wire at your chosen spot. The inclusion of such a current limiting device is common place in the wrist strap grounding devices used by computer and bench technicians who work with IC chips. This is also a good idea for your personal safety. If you were to somehow touch the ground knob and a hot chassis at the same time, this resistor will limit the current during the discharge, thereby saving you the "bite" of any shock that you might feel. To the group of you (HAL, Steven and Sam) that took the time to remind me what a bonehead I was for forgetting this, my sincere thanks!
|
|
| All Contents Copyright © 1999 SoundStage! All Rights Reserved |
 paintability, it
can be camouflaged to fit in with any décor. This is something that may be necessary to
appease the significant other.
paintability, it
can be camouflaged to fit in with any décor. This is something that may be necessary to
appease the significant other. 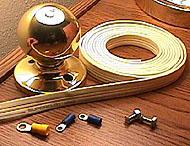 You’ll also likely need
some wire terminations and some screws. Depending upon what you choose to use for your
"lightning rod," the screws will vary in size and type. I used two 1/4"
machine-threaded screws and nuts to anchor one end of the cable to my chosen knob. I also
needed several wire terminations, which would facilitate me attaching the wire to both the
knob at one end, and the wall ground at the other. I used two No.6 ring tongues for
16-gauge wire and one No.10 ring tongue for 10-gauge wire (see upper left). If you can
find them as separate items, by all means, buy them that way. I got mine out of an
81-piece terminal kit from Radio Shack (part number 64-3098, selling for $6.49).
You’ll also likely need
some wire terminations and some screws. Depending upon what you choose to use for your
"lightning rod," the screws will vary in size and type. I used two 1/4"
machine-threaded screws and nuts to anchor one end of the cable to my chosen knob. I also
needed several wire terminations, which would facilitate me attaching the wire to both the
knob at one end, and the wall ground at the other. I used two No.6 ring tongues for
16-gauge wire and one No.10 ring tongue for 10-gauge wire (see upper left). If you can
find them as separate items, by all means, buy them that way. I got mine out of an
81-piece terminal kit from Radio Shack (part number 64-3098, selling for $6.49). If you are using a non-custom
wire, you are stuck with its insulator color, so be sure to pick something that you (and
especially any significant other) can live with. If using a wire like the paintable
Monster Cable, be sure that you paint it at this point if you are going to do so. If you
get paint on the ring tongues, take some fine sandpaper or something similar and remove
the paint from them for maximum conductivity.
If you are using a non-custom
wire, you are stuck with its insulator color, so be sure to pick something that you (and
especially any significant other) can live with. If using a wire like the paintable
Monster Cable, be sure that you paint it at this point if you are going to do so. If you
get paint on the ring tongues, take some fine sandpaper or something similar and remove
the paint from them for maximum conductivity.  Take the other end of the
wire, place the running length down the back or your equipment rack and route the single
termination end to the nearest grounded receptacle. You will want to make sure that the
receptacle offers a good ground. You can do this with a volt-ohm meter set to 20 volts AC
or higher. Place the black lead on the center screw at the receptacle plate (be sure to
use an unpainted point) and then place the red lead on a chassis screw or other
non-painted point on a piece of your equipment. You should be able to read the floating AC
voltage on your equipment. If you cannot, this screw is not grounded. You will have to try
another outlet. If you do get a good ground, remove the center-plate screw, thread it
through the single number 10 ring attached to the end of the wire, and then screw it back
into the plate, re-securing it to the wall (see left). Voilà! The finished zap
arrestor.
Take the other end of the
wire, place the running length down the back or your equipment rack and route the single
termination end to the nearest grounded receptacle. You will want to make sure that the
receptacle offers a good ground. You can do this with a volt-ohm meter set to 20 volts AC
or higher. Place the black lead on the center screw at the receptacle plate (be sure to
use an unpainted point) and then place the red lead on a chassis screw or other
non-painted point on a piece of your equipment. You should be able to read the floating AC
voltage on your equipment. If you cannot, this screw is not grounded. You will have to try
another outlet. If you do get a good ground, remove the center-plate screw, thread it
through the single number 10 ring attached to the end of the wire, and then screw it back
into the plate, re-securing it to the wall (see left). Voilà! The finished zap
arrestor.